
The Real Question Isn't Whether to Use a Light — It's How
The debate about whether a weapon light reveals your position has been covered extensively. The short answer: in most civilian defensive scenarios, your position is already known to the adversary, and the inability to identify a threat in darkness is far more dangerous than any position-reveal risk the light creates.
But that answer doesn't end the conversation. Even if you've accepted that a weapon light is the right tool for defensive carry, there are real tactical considerations about how to use it effectively — how to maximize its advantages while minimizing the scenarios where it could work against you. Understanding low-light tactics, the mechanics of how a weapon light affects both you and an adversary, and the techniques that experienced instructors teach will make you a more effective defensive carrier in low-light conditions.
This guide covers the tactical use of a weapon light in defensive scenarios: the blinding and disorientation effect, momentary vs constant-on activation, movement and light discipline, the role of a laser aiming device, and how to build a complete low-light defensive system. WARRIORLAND's weapon light lineup is referenced throughout for practical product context.
Understanding What Your Weapon Light Does to an Adversary
The Blinding Effect: More Powerful Than Most Carriers Realize
A high-output weapon light — 800 lumens or more — directed at an adversary's face in a dark environment produces a physiological effect that goes beyond simple illumination. The human eye in a dark environment is adapted to low light — the pupils are dilated, the rod cells are active, and the visual system is optimized for detecting movement and shapes in near-darkness. The sudden introduction of 800+ lumens of focused light overwhelms this adapted visual system.
The effects on the adversary include:
- Temporary vision loss: The sudden transition from darkness to intense light causes the pupils to constrict rapidly, but this constriction takes time. During that transition, the adversary's vision is severely impaired — they cannot see clearly, cannot identify the defender's exact position, and cannot accurately aim.
- Disrupted threat assessment: The adversary cannot accurately assess the situation — how many defenders are present, where they are positioned, what their capabilities are — while blinded by the light.
- Psychological disruption: The sudden, intense light creates a startle response that interrupts the adversary's decision-making. Even a trained adversary requires time to recover from the startle and reorient.
- Aiming impairment: An adversary who cannot see clearly cannot aim accurately. The blinding effect directly degrades the adversary's ability to engage the defender effectively.
This blinding effect is one of the weapon light's most significant defensive advantages — and it's one that's often underappreciated by carriers who think of the light primarily as an identification tool. The light doesn't just reveal the adversary; it actively degrades their ability to respond effectively.
The Position Paradox: Why the Light Doesn't Reveal as Much as You Think
The common concern is that the weapon light reveals the defender's position to the adversary. This concern is valid in a narrow set of circumstances but overstated for most civilian defensive scenarios. Here's why:
When a high-output weapon light is directed at an adversary's face, the adversary is looking into the light source. The intense light that impairs their vision also prevents them from seeing clearly what's behind the light — including the defender holding it. The defender is effectively hidden behind the light beam, visible only as a silhouette at best.
This is the opposite of the position-reveal concern's implication. The light doesn't clearly reveal the defender's position to a blinded adversary — it reveals the light source's position while obscuring the defender behind it. An adversary who fires toward the light source is firing toward the light, not necessarily toward the defender's body.
This doesn't mean the defender should stand still and hold the light steady. Movement — discussed below — is still tactically sound. But the position-reveal concern is significantly mitigated by the blinding effect that prevents the adversary from clearly seeing the defender behind the light.
Momentary-On vs Constant-On: The Most Important Tactical Decision
Why Momentary-On Is the Primary Defensive Mode
Most quality weapon lights offer two activation modes: momentary-on (the light is on only while the activation button is pressed and held) and constant-on (the light stays on after a single press until pressed again). Understanding when to use each mode is one of the most important tactical decisions in low-light defensive use.
Momentary-on is the primary defensive mode for several reasons:
- Controlled exposure: Momentary-on allows the defender to illuminate briefly for identification or disorientation, then return to darkness. This limits the duration of any position-reveal risk and prevents the adversary from tracking the light source over time.
- Tactical flexibility: Brief illumination followed by movement — the "light and move" technique — is only possible with momentary-on activation. Constant-on illumination while moving defeats the purpose of movement as a tactical tool.
- Battery conservation: Momentary-on activation uses significantly less battery than constant-on, extending runtime for extended defensive situations.
- Prevents accidental sustained illumination: If the pistol is dropped or the hand is injured, a momentary-on light extinguishes immediately. A constant-on light continues to illuminate, potentially revealing the defender's position.
Constant-on is appropriate when:
- The threat has been identified and the defender is actively engaging or preparing to engage
- The defender needs sustained illumination for re-holstering or other tasks requiring both hands
- The environment requires continuous illumination for safe movement (navigating a dark space with obstacles)
The tactical default is momentary-on. Constant-on is a deliberate choice for specific situations, not the default operating mode.
The "Light and Move" Technique
The most effective low-light defensive technique combines momentary-on activation with movement:
- Illuminate briefly: Activate the light for 1–2 seconds to identify the threat and disorient the adversary
- Extinguish: Release the momentary-on button, returning to darkness
- Move: Immediately move to a different position while the adversary is disoriented and the light is off
- Re-illuminate if necessary: Activate the light again from the new position for continued identification or engagement
This technique exploits the adversary's disorientation window — the brief period after the light extinguishes when the adversary's vision is still impaired and they're attempting to reorient. During this window, the defender can move to a new position without the adversary being able to track them accurately.
The technique requires practice to execute reliably under stress. The timing — how long to illuminate, when to move, how far to move — must become automatic through repetition. Low-light training sessions at a range that offers them are the most effective way to develop this skill.
Movement and Light Discipline in Low-Light Environments
The Fundamental Principle: Don't Be Where the Light Was
The core principle of low-light movement with a weapon light is simple: after illuminating, move. Don't remain stationary at the position where you activated the light. Even if the adversary is disoriented, they know approximately where the light came from. Moving immediately after extinguishing the light means you're no longer at the position the adversary is oriented toward.
This principle applies even in home defense scenarios where movement options are limited. Moving even a few feet — stepping to the side of a doorway, moving behind cover, changing your angle — is better than remaining stationary at the position where you illuminated.
Cover vs Concealment in Low-Light Scenarios
Understanding the difference between cover and concealment is critical for low-light defensive positioning:
Cover stops bullets. Concrete walls, engine blocks, and solid furniture are cover. In a home defense scenario, cover options are limited — most interior walls do not stop pistol rounds. Exterior walls, refrigerators, and some furniture may provide partial cover.
Concealment hides your position but doesn't stop bullets. Darkness is concealment. A closed door is concealment. A piece of furniture that doesn't stop rounds is concealment. In low-light scenarios, darkness is your primary concealment tool — and the weapon light, used correctly with momentary-on activation and movement, allows you to use darkness as concealment while still being able to identify and respond to threats.
The tactical goal in a low-light defensive scenario is to use cover when available, use darkness as concealment when cover isn't available, and use the weapon light's momentary-on capability to illuminate briefly without surrendering your concealment for extended periods.
Searching vs Responding: Two Different Light Disciplines
Low-light defensive scenarios typically involve two distinct phases that require different light discipline:
The searching phase: You've heard a noise or been alerted to a potential threat. You're moving through your home or environment to investigate. During this phase, you should not be using your weapon-mounted light for general illumination — doing so means pointing your pistol at everything you illuminate, which is unsafe and tactically unsound. A handheld flashlight, held separately from the pistol, is the correct tool for the searching phase. It allows you to illuminate without muzzling everything in your path.
The response phase: You've identified a threat. The pistol is deployed. This is when the weapon-mounted light becomes the primary tool. Both hands are on the pistol, the light illuminates exactly where the muzzle is pointed, and the momentary-on technique allows controlled illumination during the engagement.
The transition between these phases — from handheld flashlight for searching to weapon-mounted light for response — must be practiced. The handheld light goes into a pocket or is dropped; the pistol is drawn with the weapon-mounted light ready. This transition requires training to execute smoothly under stress.
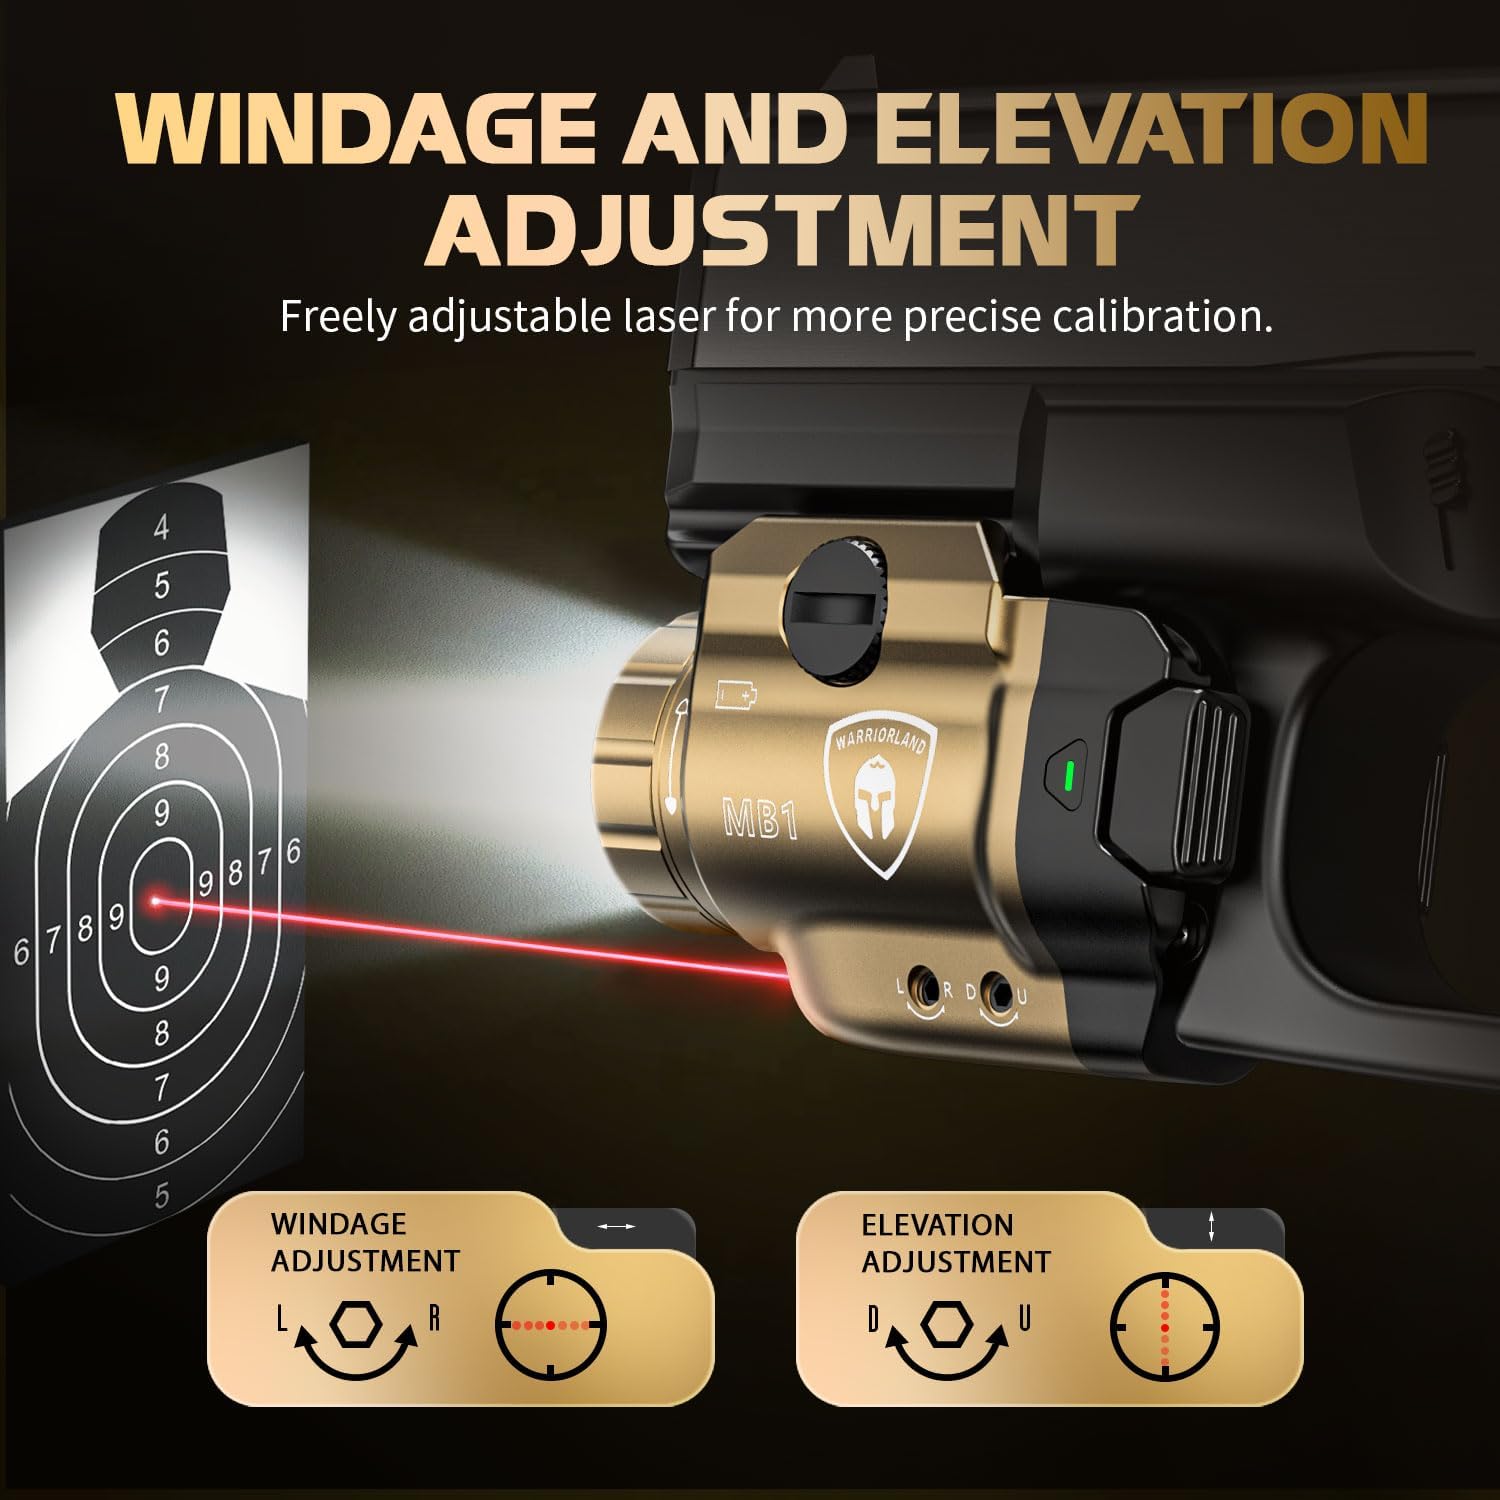
The Role of a Laser Aiming Device in Low-Light Defense
Why Lasers Complement Weapon Lights
A laser aiming device — particularly a green laser, which is significantly more visible than red in daylight and low-light conditions — provides a capability that a weapon light alone cannot: accurate aiming without requiring the shooter to align iron sights or an optic.
In low-light defensive scenarios, traditional sight alignment is challenging. The sights may not be visible, the shooter's focus is on the threat rather than the sights, and the stress of a defensive encounter degrades fine motor skills. A laser aiming device allows the shooter to aim accurately by placing the laser dot on the target — a gross motor skill that's more reliable under stress than fine-motor sight alignment.
The combination of a weapon light and a laser aiming device provides:
- Target identification: The weapon light illuminates the threat for positive identification
- Adversary disorientation: The high-output light impairs the adversary's vision
- Accurate aiming: The laser provides a visible aiming point without requiring sight alignment
- Deterrence: A visible laser dot on an adversary's body is a powerful deterrent that may end the encounter without shots fired
The deterrence function of a visible laser is particularly significant. An adversary who sees a laser dot on their body receives an unambiguous message: the defender has identified them, has a weapon aimed at them, and is prepared to fire. This combination — identified, aimed at, prepared to fire — is a powerful deterrent that can end an encounter before it escalates to violence.
Green vs Red Laser: Why Color Matters
Green lasers are significantly more visible than red lasers in most lighting conditions. The human eye is most sensitive to green light (approximately 532nm wavelength), making green lasers appear brighter and more visible at the same power output. In low-light defensive scenarios, a green laser is visible at greater distances and in more ambient light than a red laser of equivalent power.
For defensive use, green laser is the preferred choice for most carriers. Red lasers are less expensive and have longer battery life, but their reduced visibility in anything other than complete darkness limits their practical utility in the varied lighting conditions of real defensive scenarios.
Specific Low-Light Scenarios and Tactical Approaches
Home Invasion at Night
The scenario: You wake to the sound of forced entry. You retrieve your pistol. You need to protect your family and identify the threat.
Tactical approach:
- Secure your family first if possible: Get family members into a safe room before moving to investigate. A locked interior door provides concealment and a barrier that slows an adversary.
- Use a handheld flashlight for initial searching: Don't draw your pistol and use the weapon-mounted light for general searching. Use a handheld light to investigate while keeping the pistol holstered or in a ready position.
- Transition to weapon-mounted light when a threat is identified: When you identify a threat, draw the pistol and use the weapon-mounted light for identification confirmation and engagement.
- Use momentary-on and move: Brief illumination, extinguish, move. Don't remain stationary at the position where you illuminated.
- Use cover when available: Position yourself behind cover (exterior walls, refrigerator, solid furniture) when possible before illuminating.
- Announce yourself if appropriate: In many home invasion scenarios, announcing your presence and armed status may deter the adversary without requiring engagement. "I'm armed and I've called the police" is a powerful deterrent.
Parking Lot or Street Encounter at Night
The scenario: You're approached in a dark parking lot or street by a potential threat. The adversary may or may not be armed.
Tactical approach:
- Create distance: Move away from the approaching threat. Distance is your most valuable tactical asset in an outdoor encounter.
- Use ambient light: Position yourself where ambient light (streetlights, store lighting) illuminates the adversary without illuminating you. This is the outdoor equivalent of using darkness as concealment.
- Draw only when necessary: Don't draw the pistol until you have a reasonable belief that deadly force may be necessary. Drawing prematurely escalates the situation and creates legal risk.
- Use the weapon light for identification and deterrence: If the pistol is drawn, the weapon-mounted light provides identification and the laser (if equipped) provides deterrence. A visible laser dot on an adversary's body is a powerful deterrent.
- Move after illuminating: In an outdoor encounter, movement is more practical than in a confined indoor space. Use the light-and-move technique to avoid being a stationary target.
Vehicle Defense at Night
The scenario: You're in your vehicle and a threat approaches. The vehicle's interior creates extreme blowback conditions for high-output lights.
Tactical approach:
- Use the vehicle's lights: Headlights, interior lights, and the vehicle's own lighting can illuminate a threat without requiring the weapon light. Use the vehicle's lighting before drawing the pistol.
- Exit the vehicle if possible: A vehicle is not cover — most vehicle doors don't stop pistol rounds. Exiting the vehicle and using it as concealment (crouching behind the engine block, which does provide cover) is often tactically superior to remaining inside.
- Use lower output if available: Vehicle interiors create severe blowback with high-output lights. If your weapon light has multiple output modes, use a lower mode inside the vehicle.
- Momentary-on only: In a vehicle, sustained illumination creates blowback that can impair your own vision. Use momentary-on activation for brief identification flashes.
Training for Low-Light Defensive Use
Why Dry Practice Isn't Enough
Low-light defensive skills cannot be fully developed through dry practice alone. The physiological effects of darkness — reduced visual acuity, altered depth perception, disrupted spatial awareness — must be experienced and trained in to develop reliable responses. Dry practice in a lit room doesn't replicate the conditions of a real low-light defensive scenario.
Low-light training at a range that offers it — where you can practice drawing, activating the weapon light, using momentary-on technique, and moving in actual low-light conditions — is the most effective way to develop these skills. Many ranges offer low-light training sessions; seek them out and prioritize them as part of your defensive training program.
What to Practice
- Draw and light activation: Practice drawing the pistol and activating the weapon light as a single integrated motion. The light should be on as the pistol is presented toward the threat, not as a separate step after the draw.
- Momentary-on technique: Practice brief illumination (1–2 seconds) followed by extinguishing. Develop the habit of releasing the momentary-on button after identification rather than holding it continuously.
- Light and move: Practice illuminating briefly, extinguishing, and moving to a new position. The movement must be immediate — don't pause after extinguishing the light.
- Re-holstering with the light: Re-holstering a light-equipped pistol requires care to ensure the light doesn't catch on the holster mouth. Practice this until it's smooth and automatic.
- Handheld to weapon-mounted transition: Practice transitioning from a handheld flashlight (for searching) to the weapon-mounted light (for response). The handheld light must be secured or dropped before drawing the pistol.
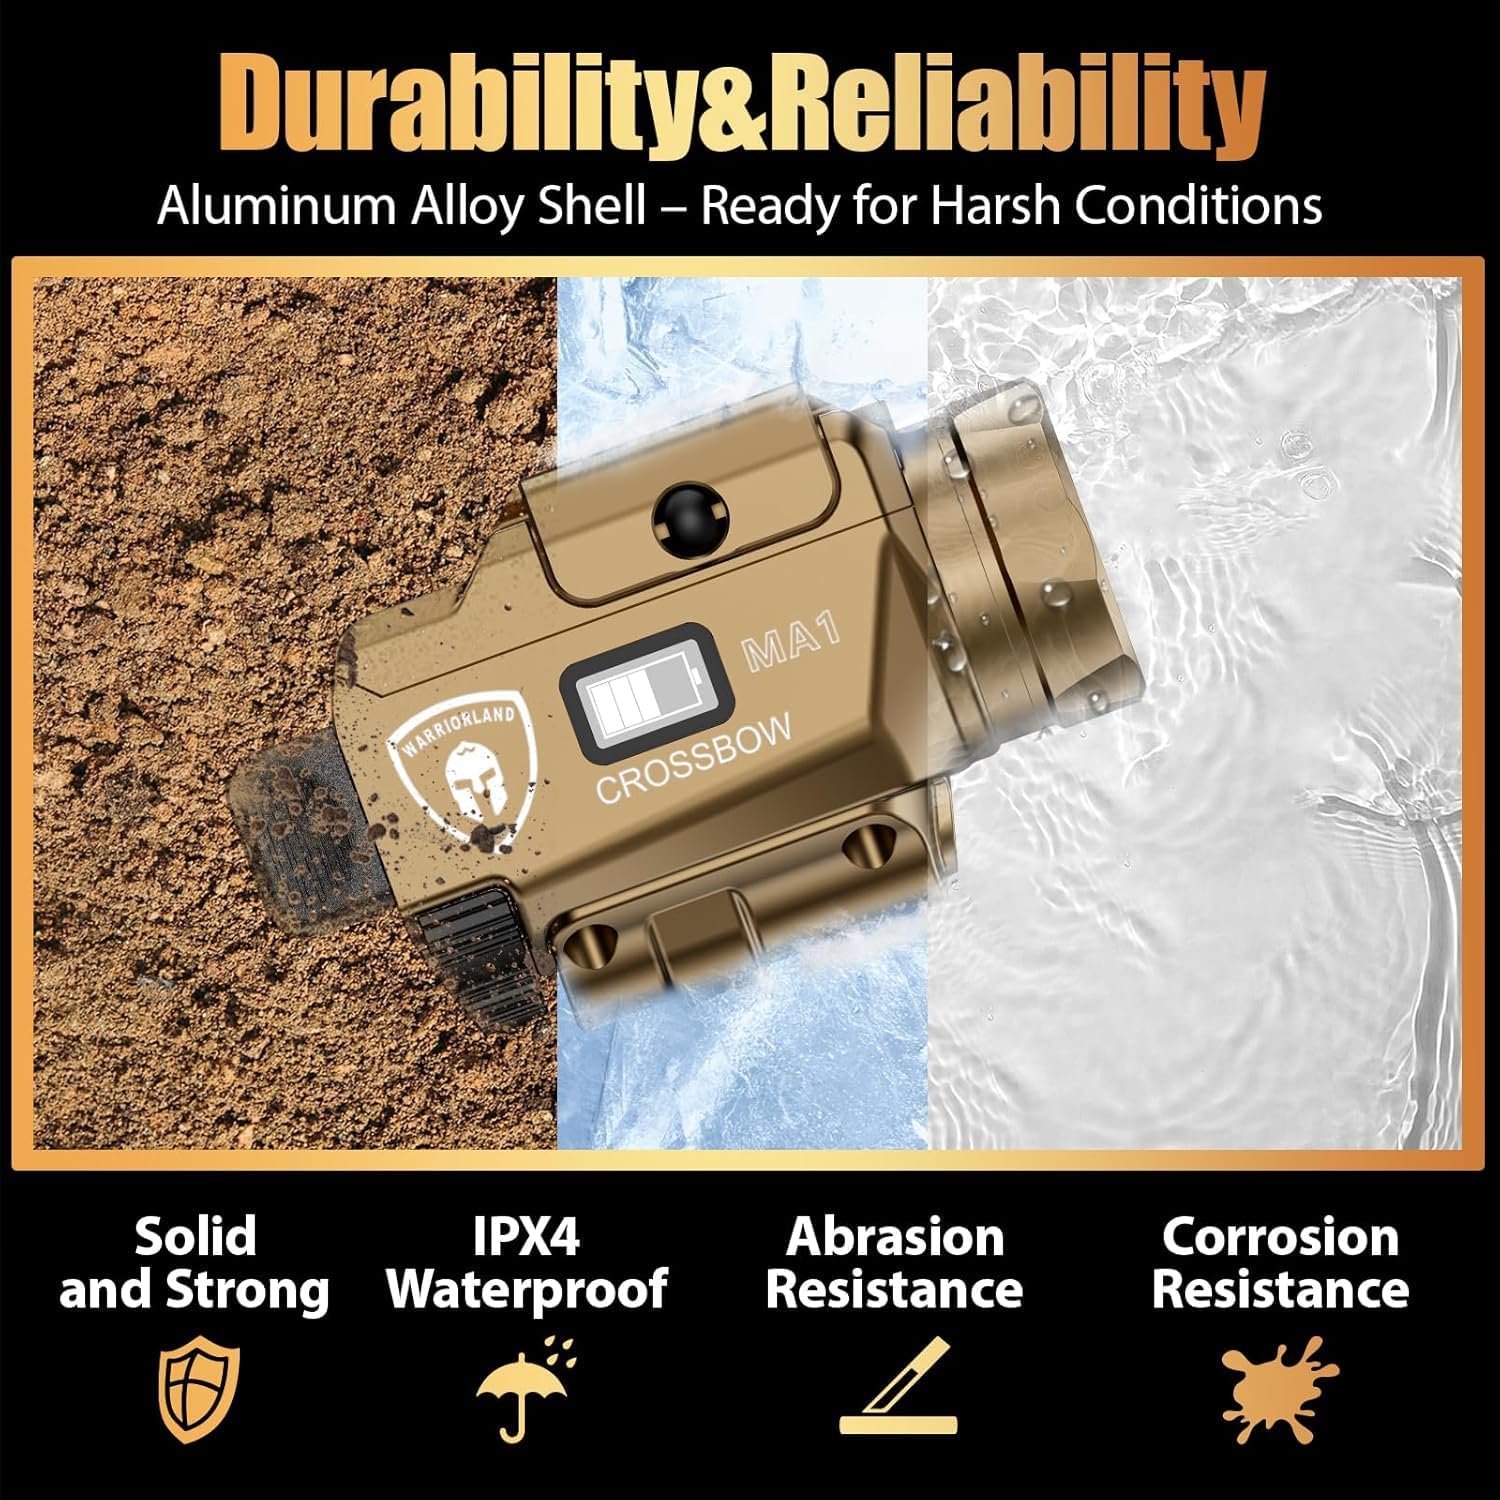
WARRIORLAND Low-Light Defensive Solutions
Rail-Mounted: Full-Power Illumination and Disorientation
For pistols with standard accessory rails, WARRIORLAND's MA2 series provides 800-lumen output — sufficient for meaningful disorientation effect in dark environments — with magnetic USB recharging and a screen-displayed battery status indicator.
- WARRIORLAND MA2 Compact Pistol Light — Universal Rail Mount, 800 Lumens, Fits 60+ Handguns — 800-lumen output, screen power indicator, magnetic USB recharging. Compatible with Glock 17/19, P365, Taurus G3C/G2C, M&P 9, Hellcat Pro, 1911, and 60+ additional handguns. Momentary-on and constant-on activation modes for tactical flexibility.
- MA2 Pistol Light with Holster — M&P 9mm M2.0 — 800-lumen weapon light with platform-specific IWB holster. Complete light-equipped carry solution for M&P M2.0 carriers.
- MA2 Pistol Light with Holster — Glock 20/21/22/23 Gen3-5 & Glock 34 Gen4 — 800-lumen weapon light with IWB holster for the larger Glock frame platforms.
Rail-Mounted Light + Green Laser: Illumination, Disorientation, and Deterrence
For carriers who want the complete low-light defensive package — identification, disorientation, and laser deterrence — the MA1 series combines 800-lumen white LED output with a green laser aiming device.
- WARRIORLAND MA1 FDE — 800 Lumens, Green Laser & White LED, Fits 100+ Models — 800-lumen white LED with green laser. Compatible with Glock 17/19, P320, Taurus G2C, Hellcat Pro, Echelon, and 100+ additional models. Battery indicator screen, magnetic USB recharging. The complete illumination-and-aiming solution for carriers who want both functions in a single package.
- MA1 Laser Light Combo with Holster — M&P Shield 9mm EZ — 800-lumen LED and green laser with platform-specific IWB holster. Complete light-and-laser carry solution for M&P Shield EZ carriers.
- MA1 FDE Laser Light Combo with Holster — Hellcat Pro — 800-lumen LED and green laser in FDE finish with IWB holster. Complete light-and-laser carry solution for Hellcat Pro carriers.
OWB Light-Bearing Holsters: Duty and Open Carry
- Glock 17/19/19X/45 Gen3-5 OWB Light-Bearing Holster — TLR-7A / TLR-7X / TLR-7 HL-X / TLR-8A / TLR-8X — Precision-fit OWB Kydex for Glock platforms with Streamlight TLR-7/8 series lights. Thumb release active retention, optic cut, 2.0" mid-ride belt loop.
- IWB Kydex Holster for Hellcat Pro OSP with TLR-7X Sub or TLR-7 HL-X Sub — Light-bearing IWB holster for the Hellcat Pro with Streamlight TLR-7 sub-compact lights. Optic cut, adjustable cant and posi-click retention.
Trigger-Mounted: Low-Light Capability for No-Rail Pistols
- SLL-105 Trigger-Mounted Light/Laser — Glock 42/43/43X/48 (No Rail) — 150-lumen white LED with red laser. Trigger-mounted for no-rail Glock platforms. Three light modes including momentary-on. Weapon light and laser capability for the most popular subcompact Glock carry pistols.
- SLL-105 Light/Laser with IWB Holster — Glock 43/43X (No Rail) — 150-lumen trigger-mounted light/laser with platform-specific IWB holster. Complete light-equipped carry solution for no-rail Glock 43/43X carriers.
- Pistol Light/Laser with IWB Holster — SIG P365-XMACRO — 150-lumen trigger-mounted green laser and white LED with platform-specific IWB holster. Complete light-and-laser carry solution for P365-XMACRO carriers.
Building the Complete Low-Light Defensive System
The Four Components
A complete low-light defensive system has four components:
- Weapon-mounted light: For the response phase — when the pistol is drawn and both hands need to be on it. Provides identification, disorientation, and (with a laser) aiming capability.
- Handheld flashlight: For the searching phase — when you need to illuminate without pointing the pistol at everything you illuminate. A quality 500–800 lumen handheld light in a pocket or pouch.
- Light-bearing holster: Required for carrying a light-equipped pistol. Must be designed for your specific pistol-plus-light combination.
- Training: The most important component. Low-light skills — momentary-on technique, light and move, searching vs response phase transitions — must be developed through practice in actual low-light conditions.
Conclusion: The Light Is a Tool — Technique Is What Makes It Work
A weapon light is not a passive accessory that automatically improves your defensive capability by being attached to your pistol. It's a tool that requires technique to use effectively — technique that must be developed through training and practice.
The momentary-on technique, the light-and-move principle, the distinction between searching and response phases, the role of a laser for deterrence and aiming — these are the skills that transform a weapon light from a simple illumination device into a genuine defensive force multiplier. Without these skills, a weapon light is just a light. With them, it's a tool that provides identification, disorientation, deterrence, and accurate aiming capability in the conditions where most defensive encounters occur.
Mount the light. Learn the technique. Train in actual low-light conditions. And carry consistently, because the best-equipped defensive system in the world doesn't help if it's at home when you need it.
WARRIORLAND's weapon light lineup — from the 800-lumen MA2 universal rail-mounted light to the MA1 light/laser combo to the SLL-105 trigger-mounted solution for no-rail pistols — provides the hardware foundation for a complete low-light defensive system. The technique is yours to develop. Build the complete system.